How To Check Your Freelander Fluids
There are some fluids in your Freelander which should be checked on a weekly basis – we know many vehicle owners do not lift the bonnet from one service to the next but we will still advocate weekly checks! Remember, these fluids are the things which keep your engine running, your brakes working, your steering turning and your vision clear; the last thing you want is for them to run too low when you are doing 70 mph down the motorway.
Here is how to check the “weekly check” fluid levels on your Freelander:
Engine oil:
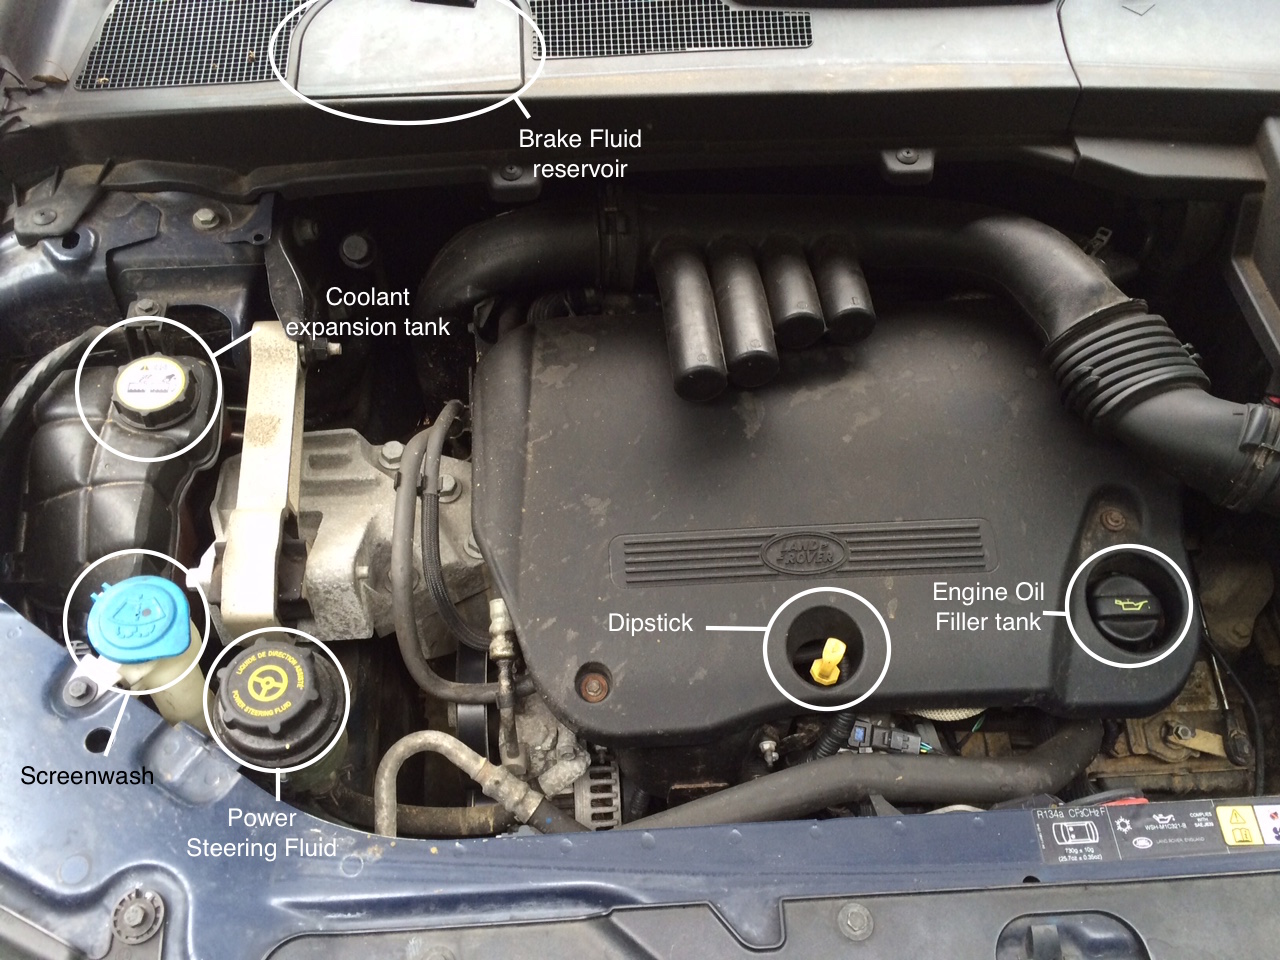
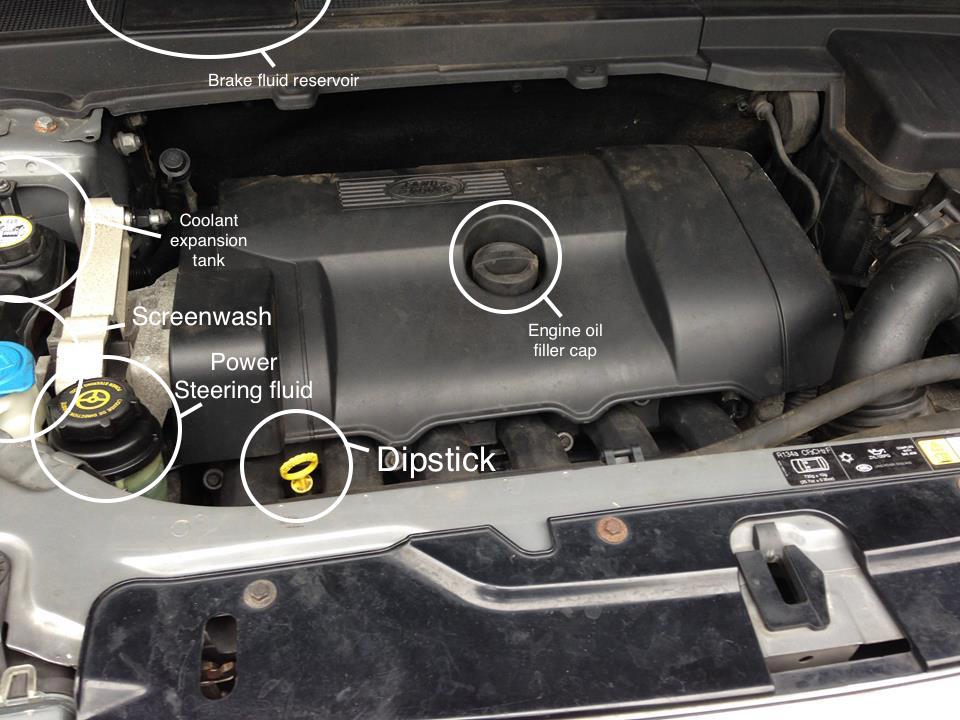
The oil dipstick handle is bright yellow for ease of location. See the diagrams for the location of the dipstick on your model of Freelander.
Freelander 1 2.5 K V6 Petrol
(Image is with engine cover removed)
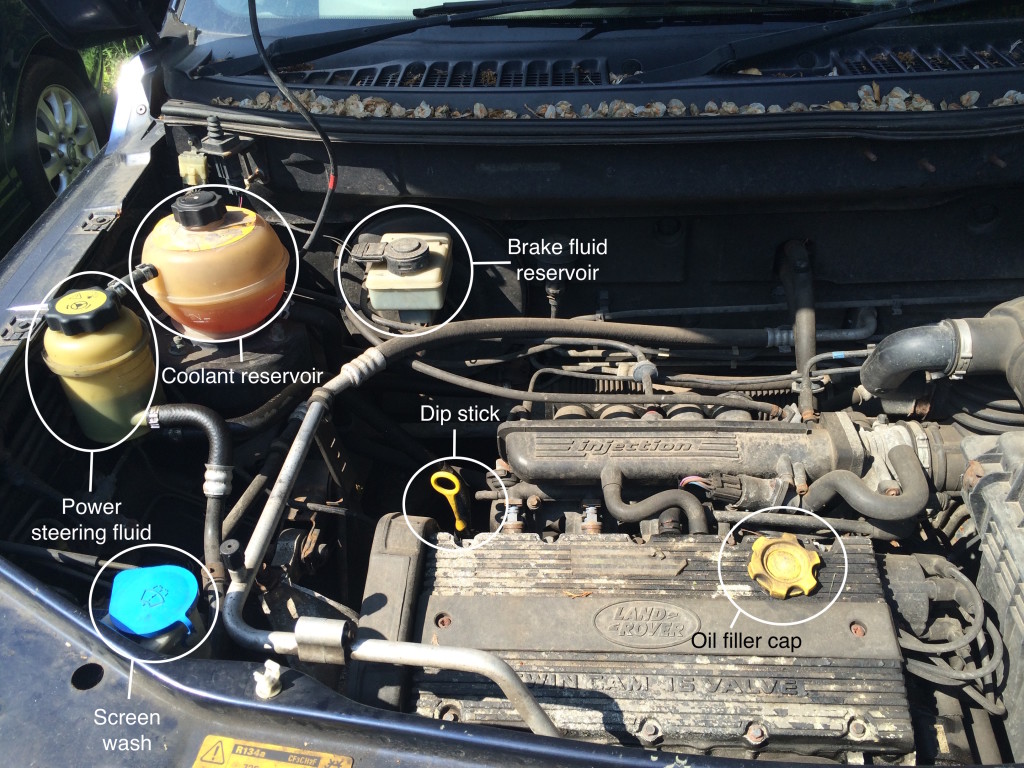
Freelander 1 L-Series 2.0 Di (1997 – 2000)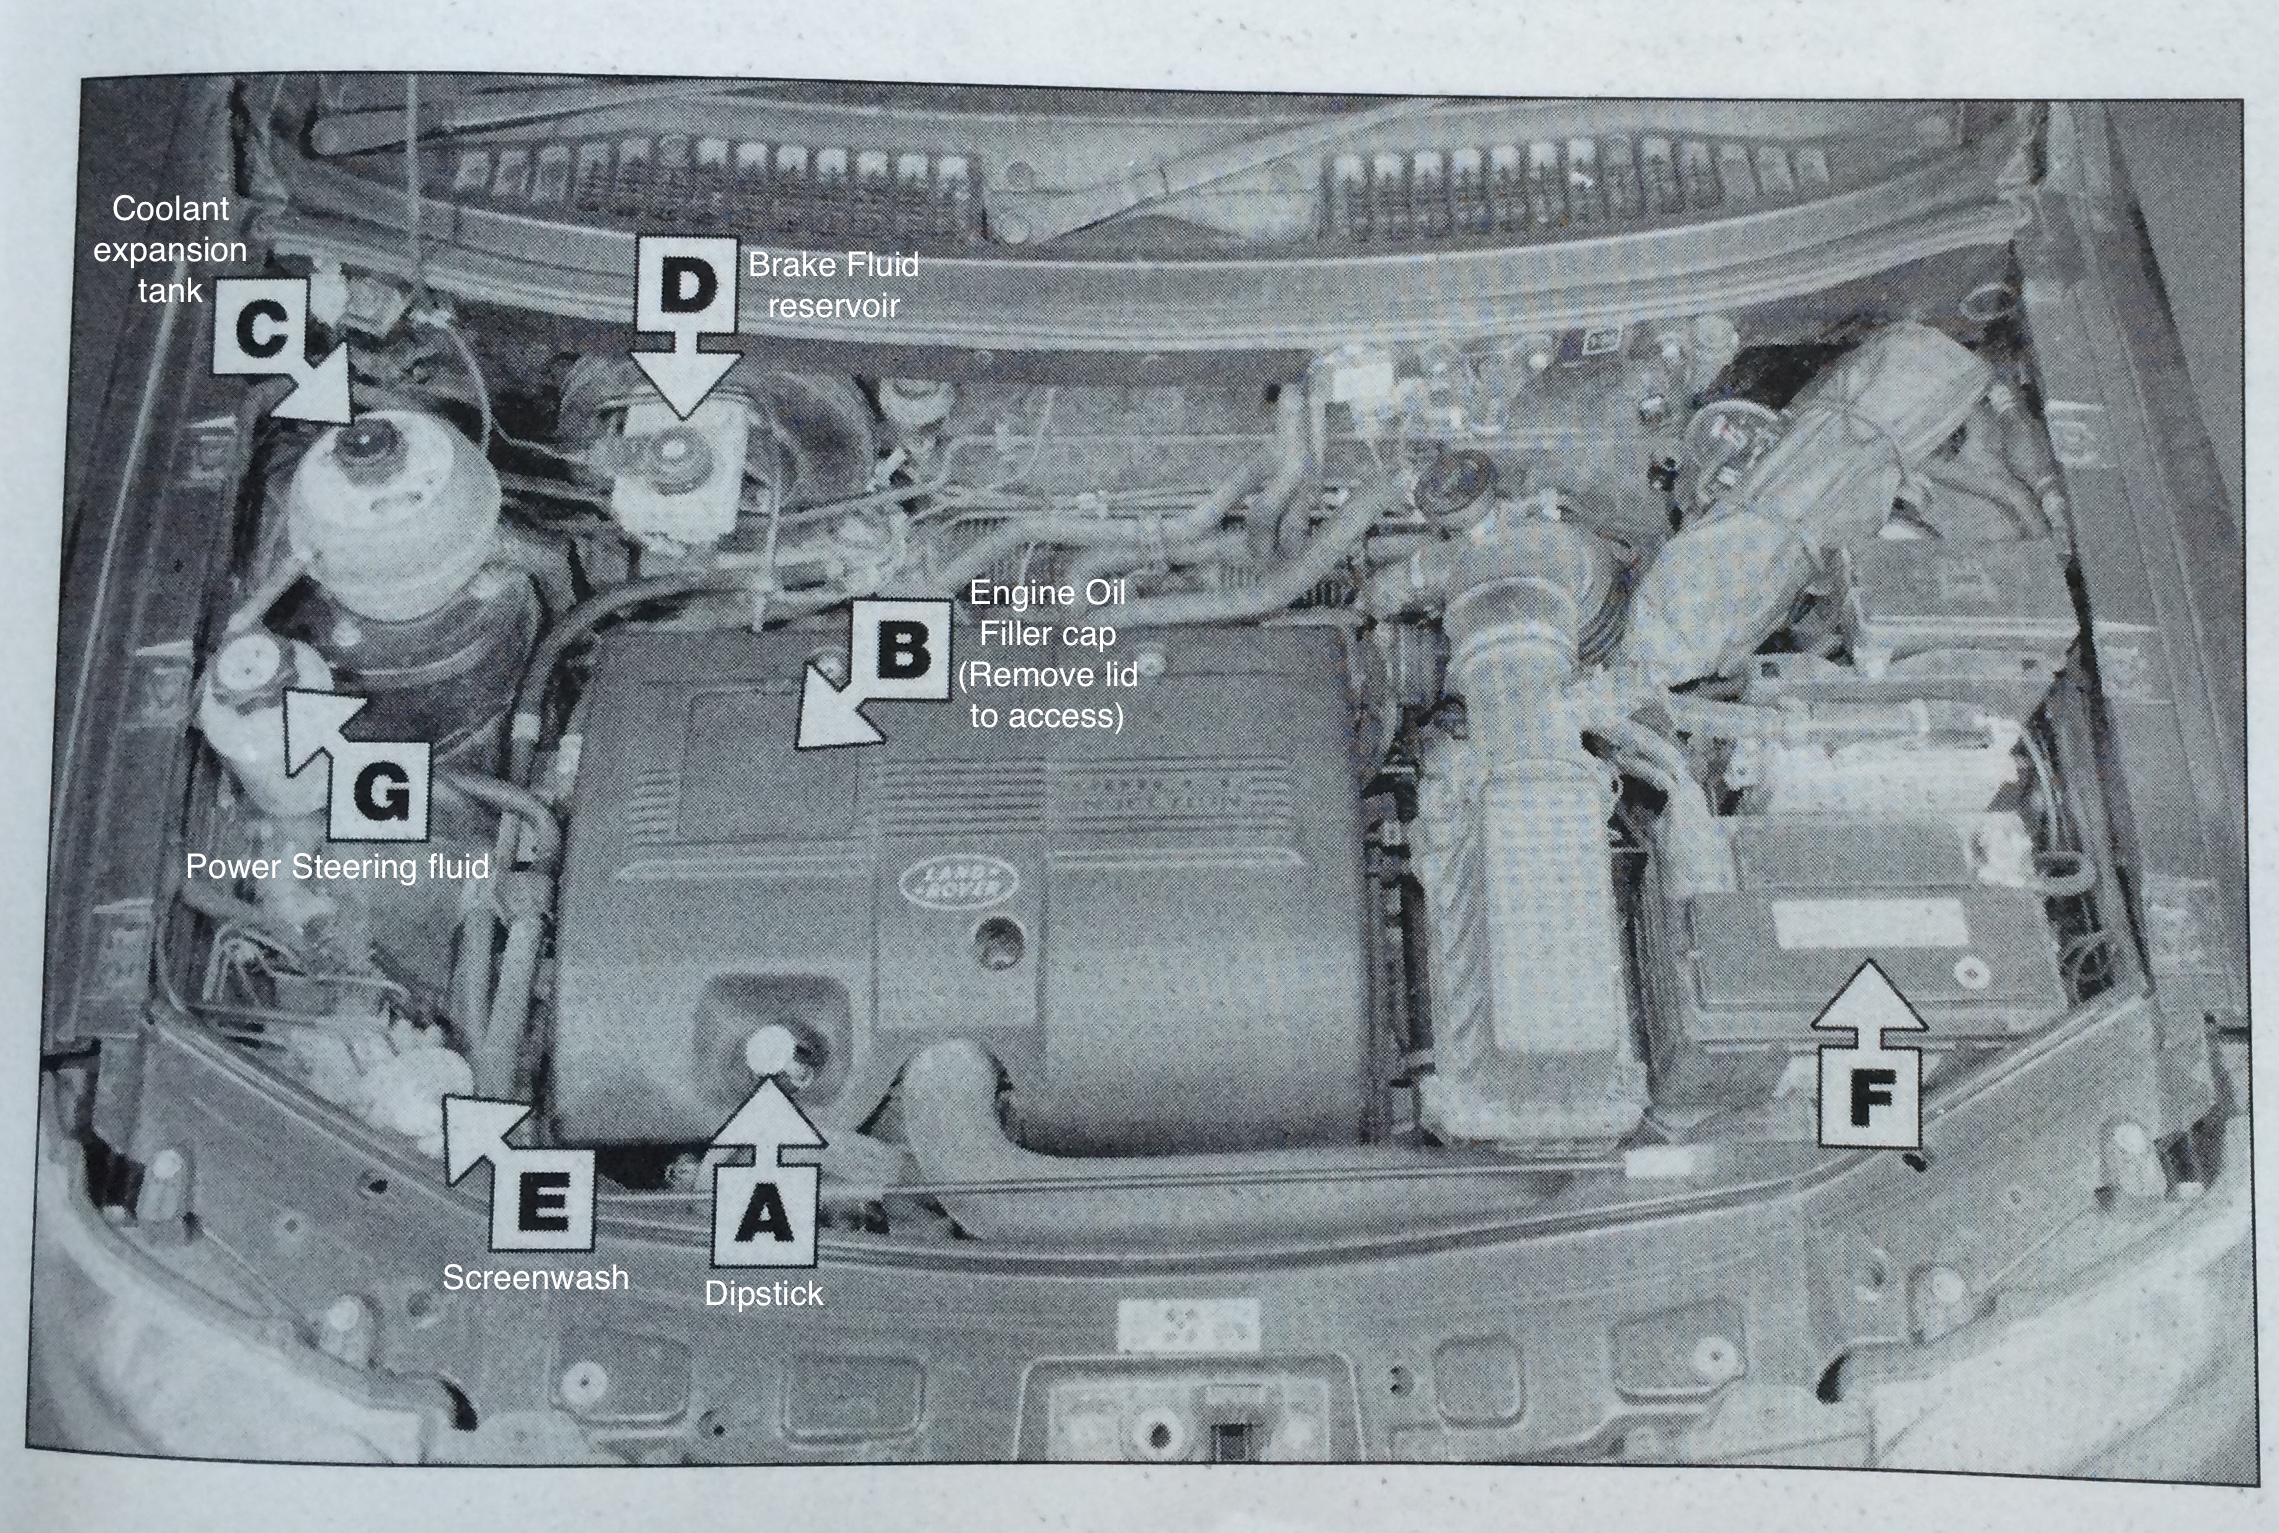
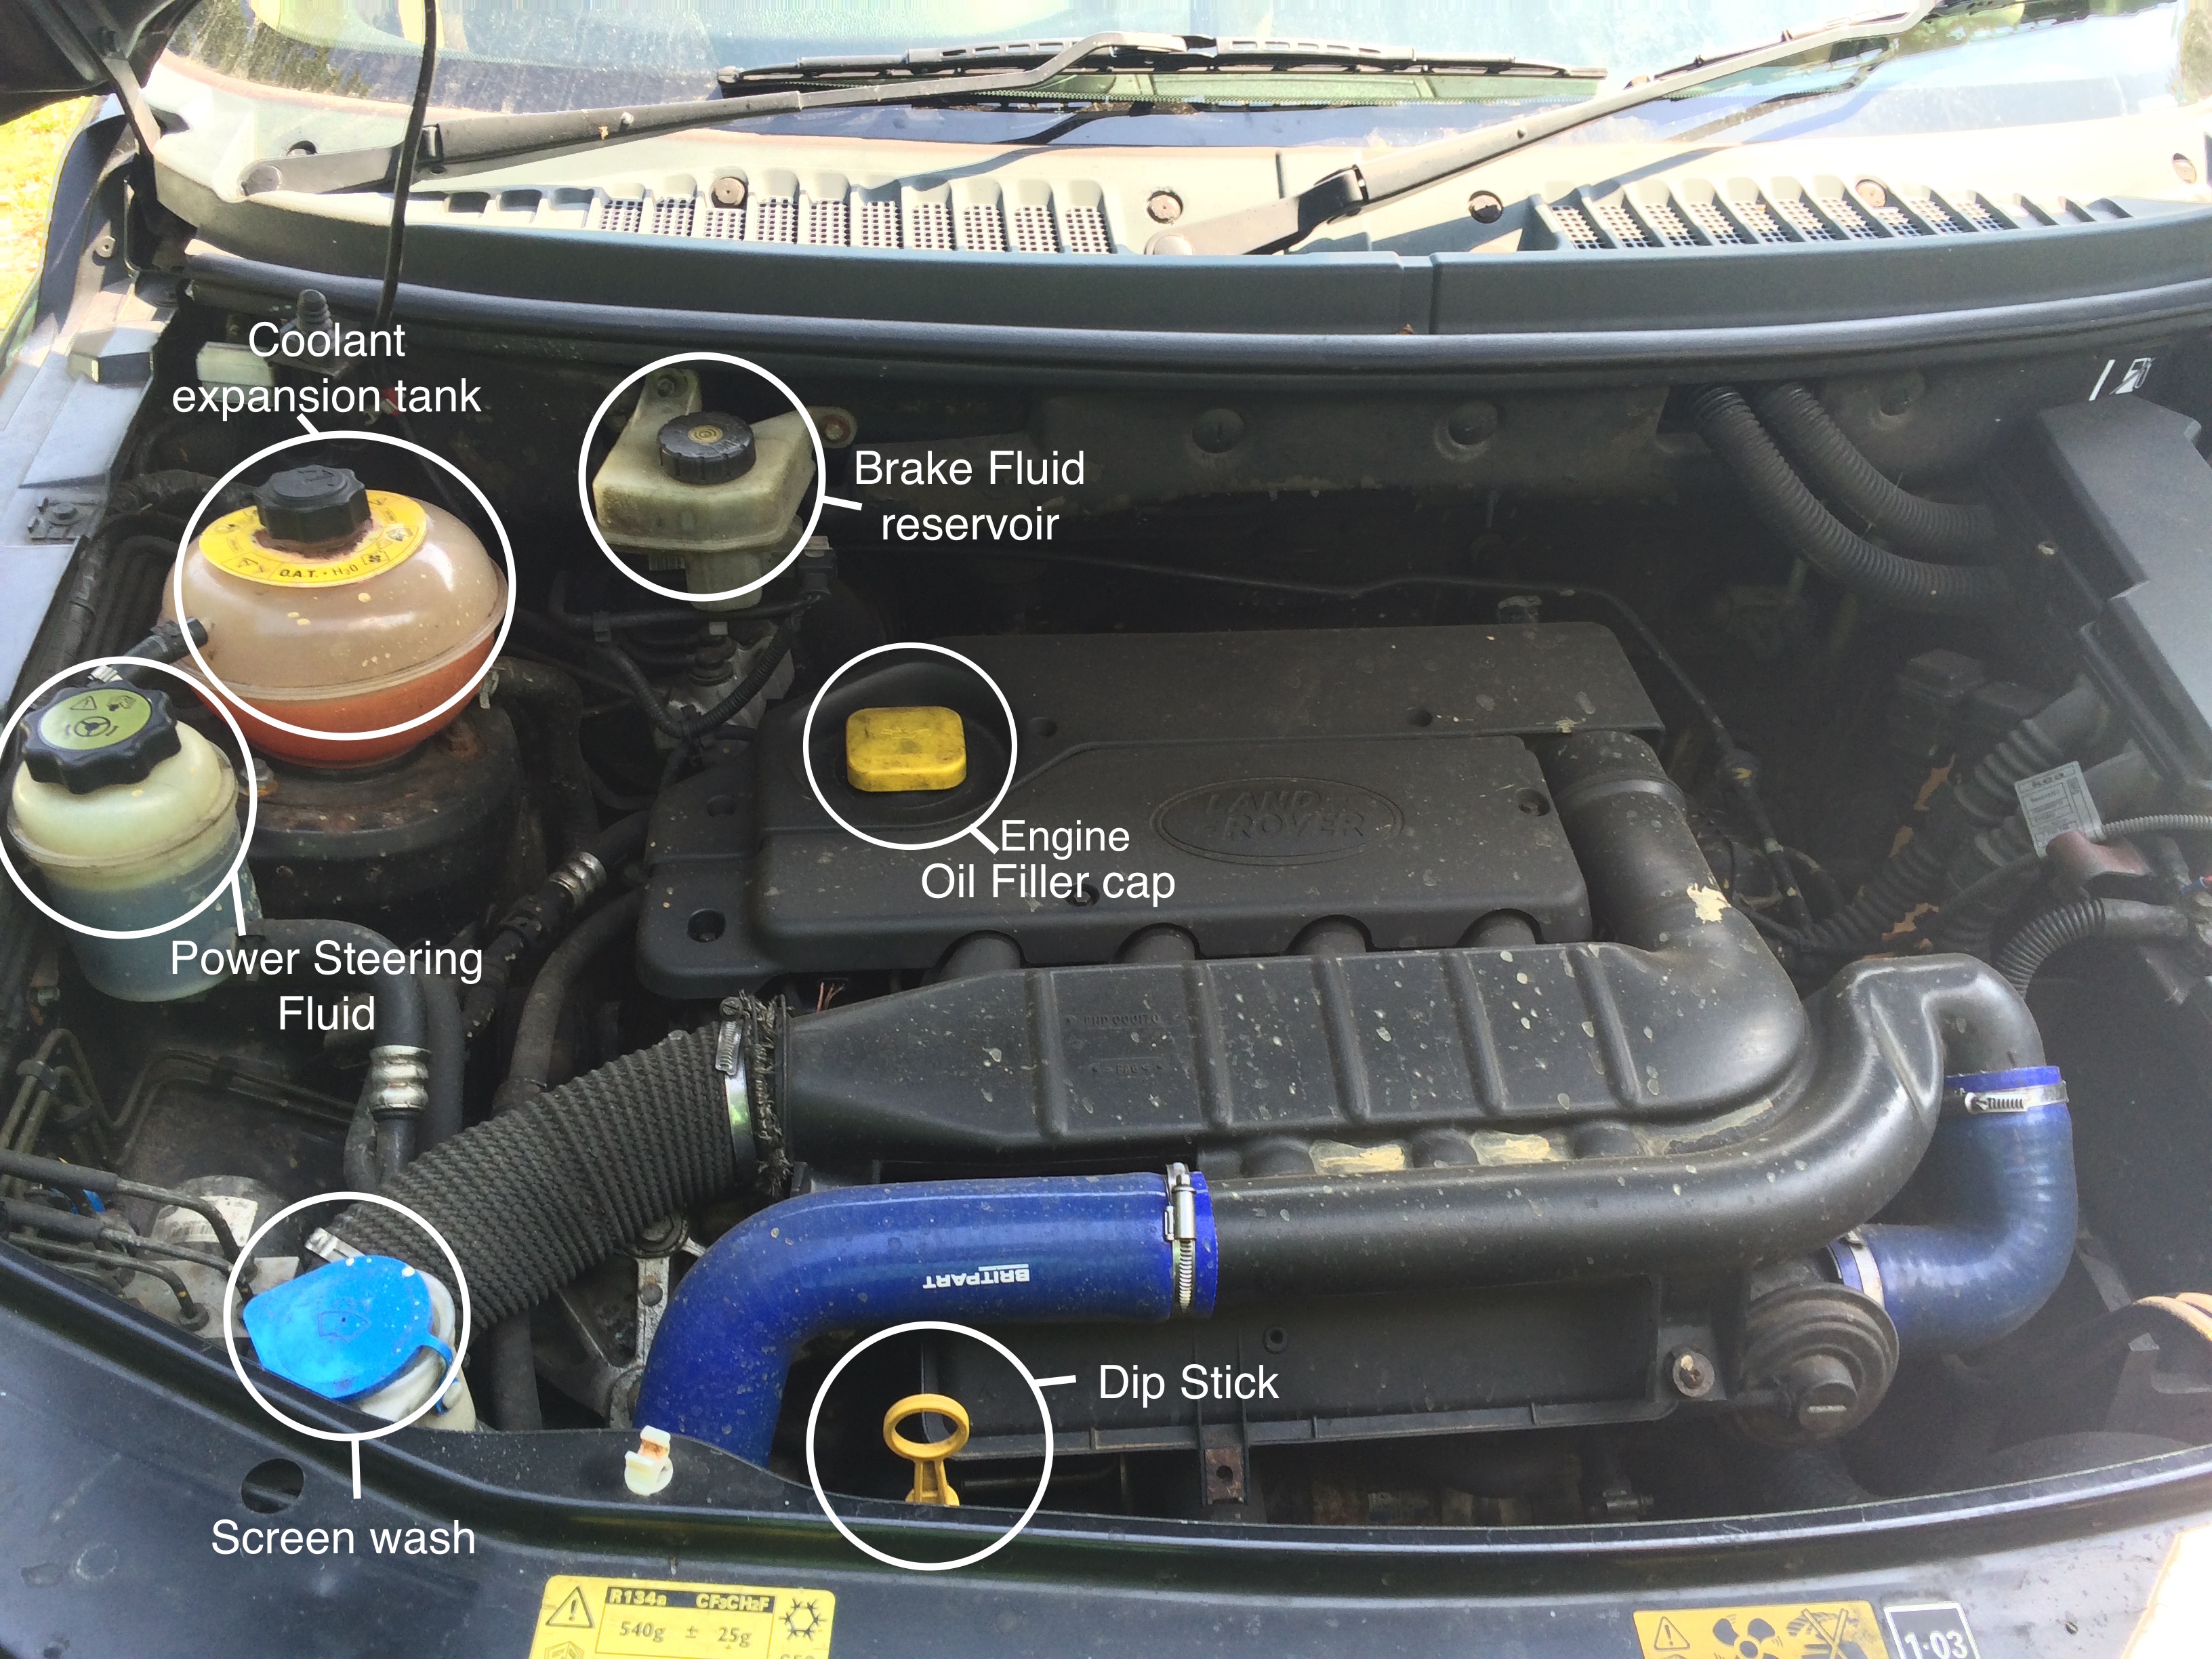
Freelander 1 Td4 2.0 (2001 – 2006)
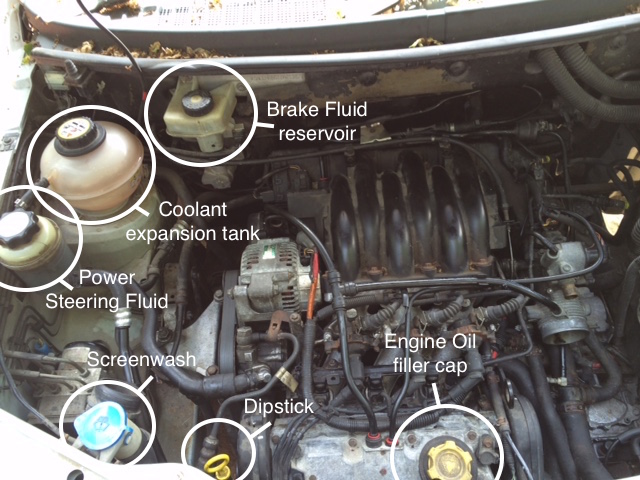
Freelander 1 1.8 Petrol
Freelander 2 2.2 TD4
Freelander 2 3.2 Petrol
 1. Ensure your Freelander is on level ground and the engine is cold. NOTE: You MUST NOT check the oil level in a Freelander whose engine is warm as some of the oil will still be around the engine and have not settled back into the oil sump, hence it will not give a true reading. Checking the oil level when the engine is warm is likely to result in a lower reading than the true level and can cause you to overfill the oil. Overfilling the oil can result in burst seals and engine damage.
2. Withdraw the dipstick. Using a clean rag or paper towel wipe all the oil from the dipstick.
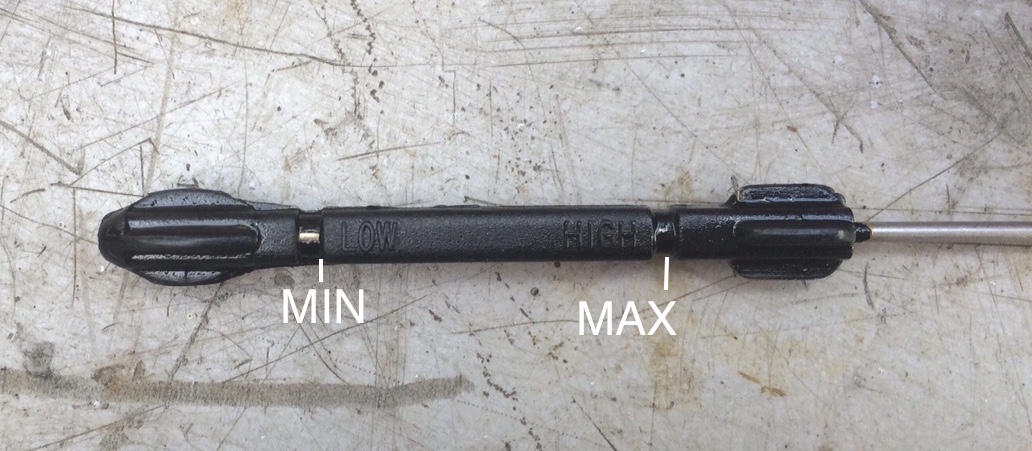
Please note, each dipstick will look slightly different in each model.
(Dipstick from Freelander 1 V6)

(Dipstick from Freelander 2 2.2)

3. On the bottom part of the dipstick there will be two marks. These are the minimum and maximum oil levels marked ‘LOW’ and ‘HIGH’.
(Freelander 1 V6 dipstick marks)
4. Insert the clean dipstick back into the tube as far it will go, then withdraw it again.
5. Note how far up the dipstick the residue of oil is – this can be difficult to see when the oil is clean. The level should be in between the minimum and the maximum mark.
6. If your oil level is below the minimum level (and your engine is cold with the Freelander parked on a level surface), gently add oil through the filler cap on the top of the engine (turn anticlockwise to remove), a little at a time, checking the oil level in between each addition, until the level is between the minimum and the maximum. A funnel may help to avoid spillage.Note: Approximately 1.0 litre of oil will raise the level from the lower mark to the upper mark. DO NOT overfill, this can cause as much damage as having too little oil.
7. If your oil level is above the maximum level you will need to have the excess oil syphoned out of the system.
Coolant:
The coolant level varies with the temperature of the engine. When the engine is cold the coolant level should be on the MAX mark on the side of the expansion tank. When the engine is hot, the level will rise slightly. Check the photographs for the position of the coolant expansion tank on your model of Freelander.
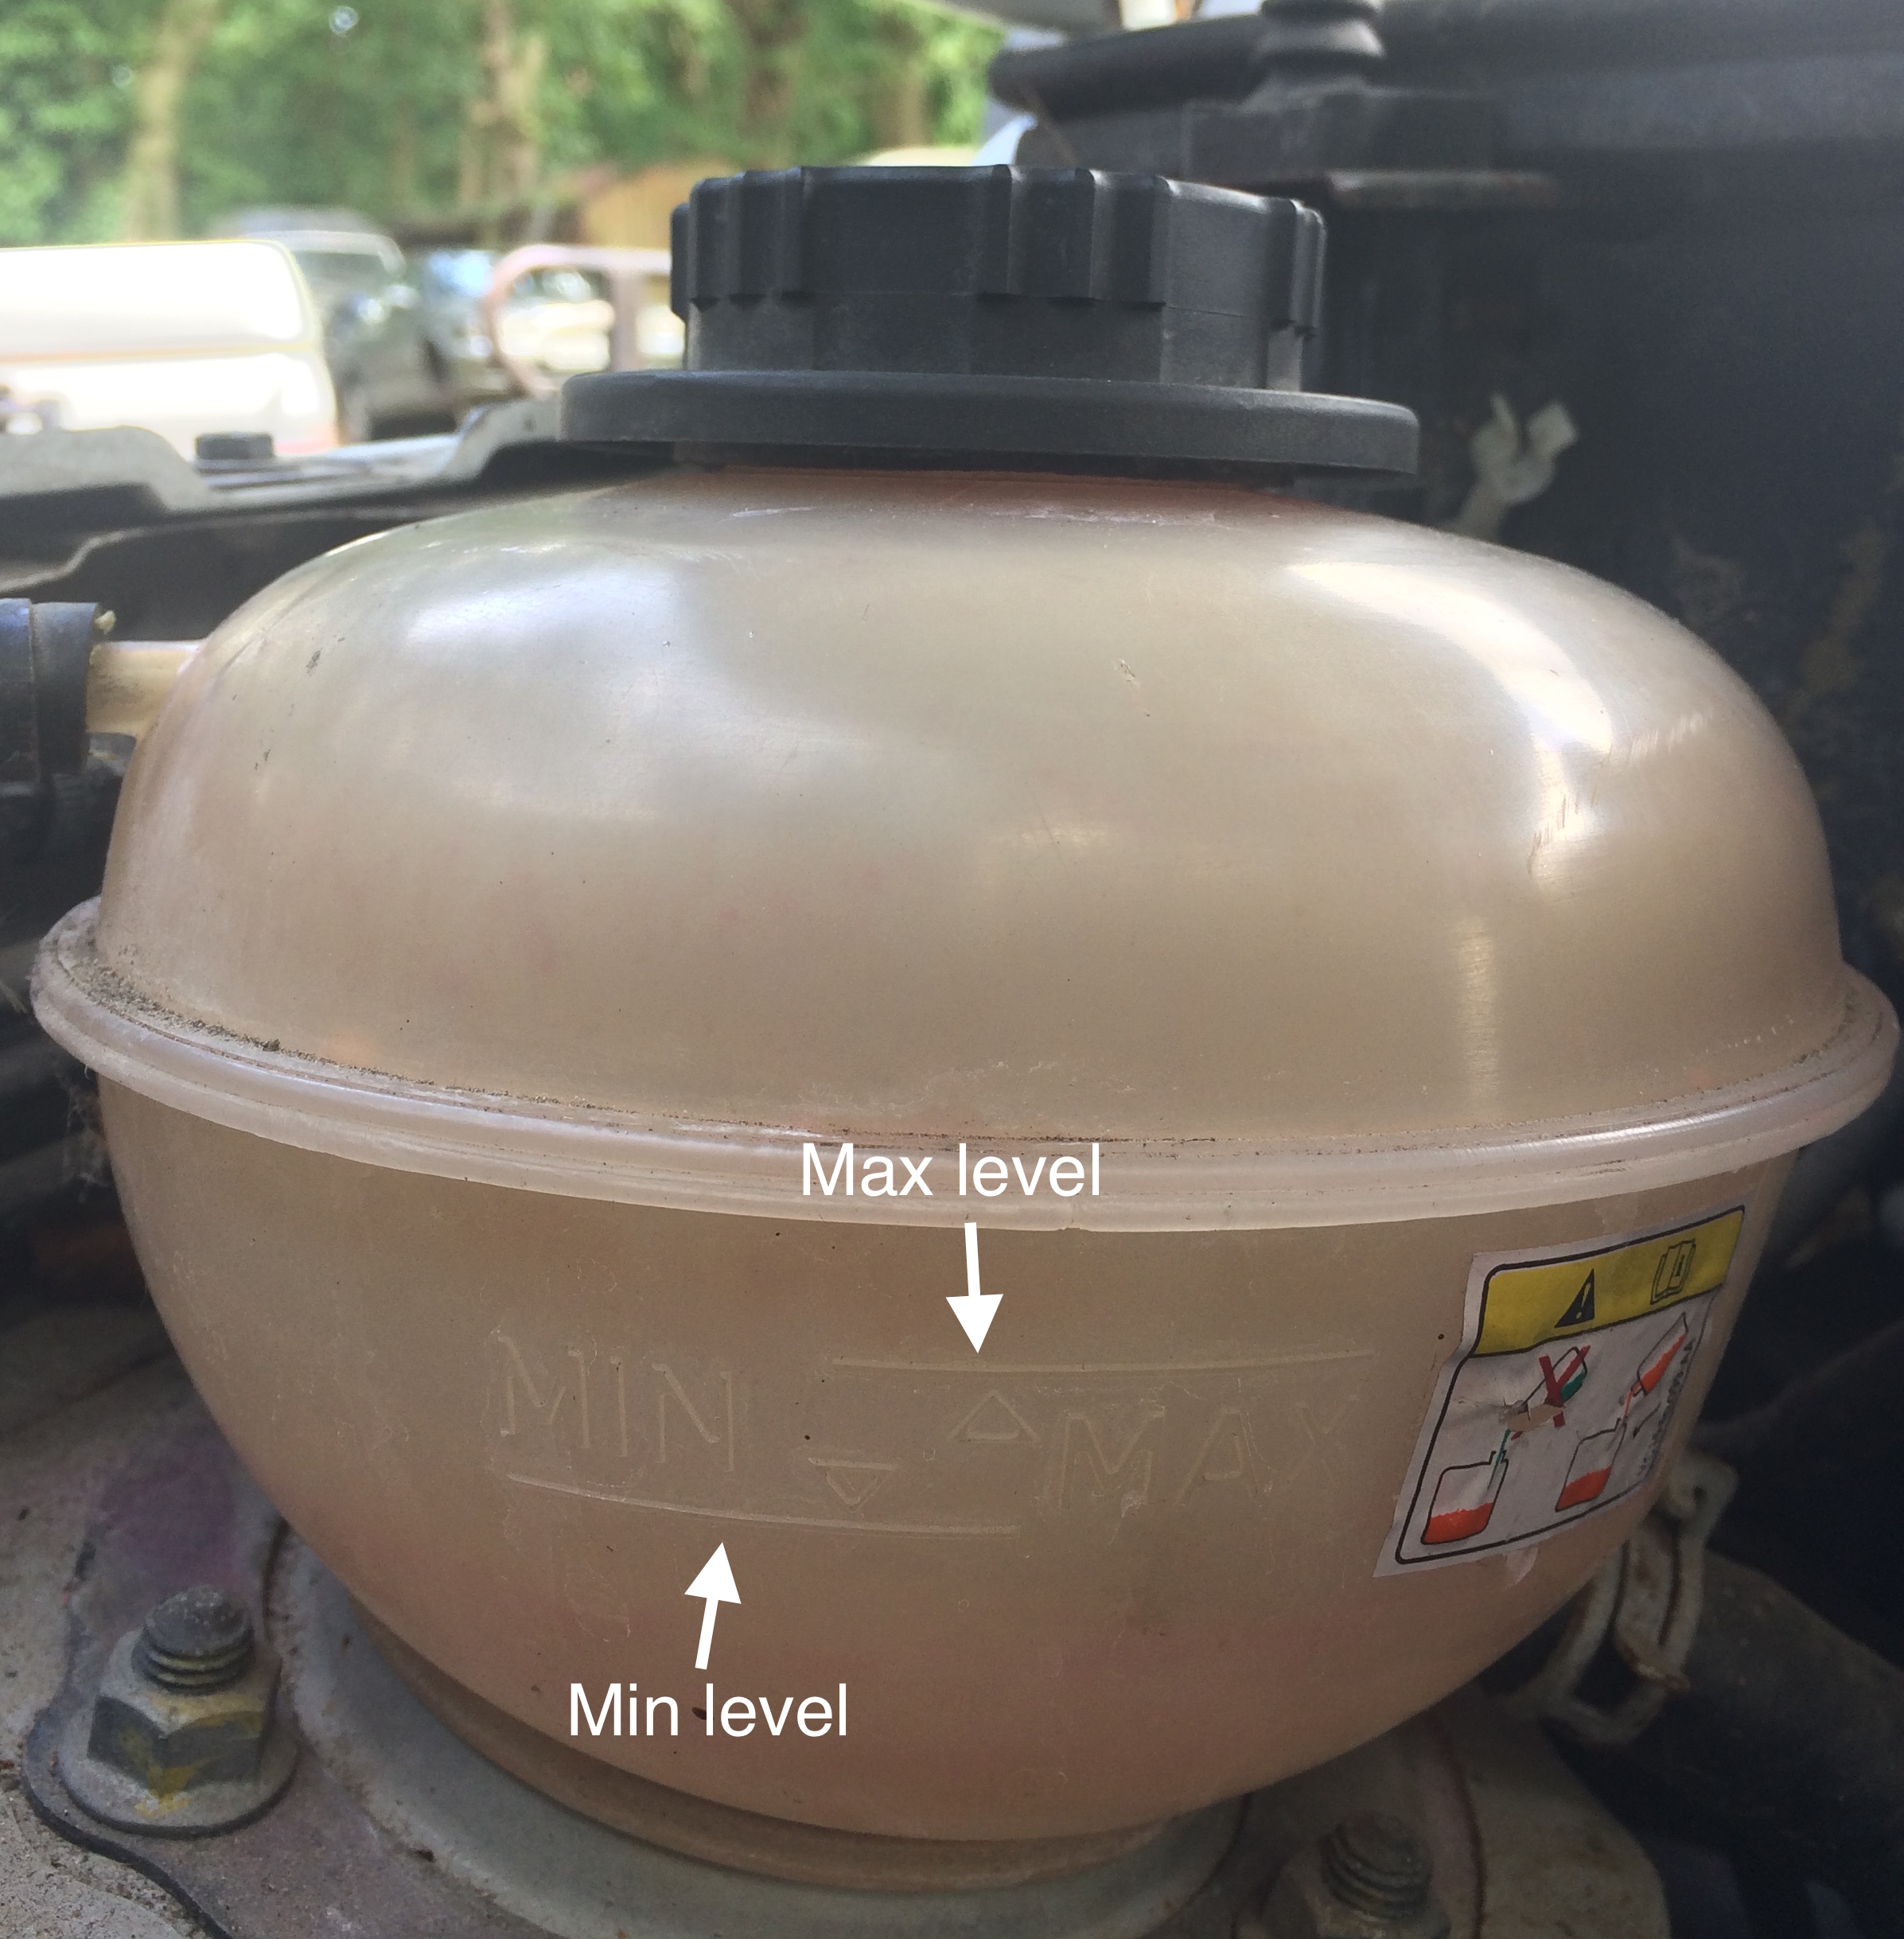
1. Check the level of your coolant against the two markers on the side of the reservoir – MIN and MAX.
2. If the level is below the minimum, wait until the engine is cold then SLOWLY unscrew the expansion tank filler cap anti-clockwise to release any pressure in the system, and remove it. BE VERY CAREFUL, IF THE COOLING SYSTEM IS STILL PRESSURISED AND HOT THIS WILL JET OUT AND BURN BADLY.
3. Add a coolant with OAT (Organic Acid Technology) – this is all RED (pink) or orange coolants, not blue or green – to the dilution stated on the container through the expansion tank filler neck, until the coolant is at the MAX level mark. Do NOT overfill as the coolant will not have enough space left to expand into and hence will blow the cooling system and can cause as much damage as not having any coolant). Refit the cap, turning it clockwise as far as it will go until it is secure.
4. If the level is above the MAX mark you will need to syphon out the excess coolant.
5. If the coolant in your coolant system is green, blue or plain water you are recommended to drain the cooling system; flush it out and replace it with a red coolant (one with OAT)
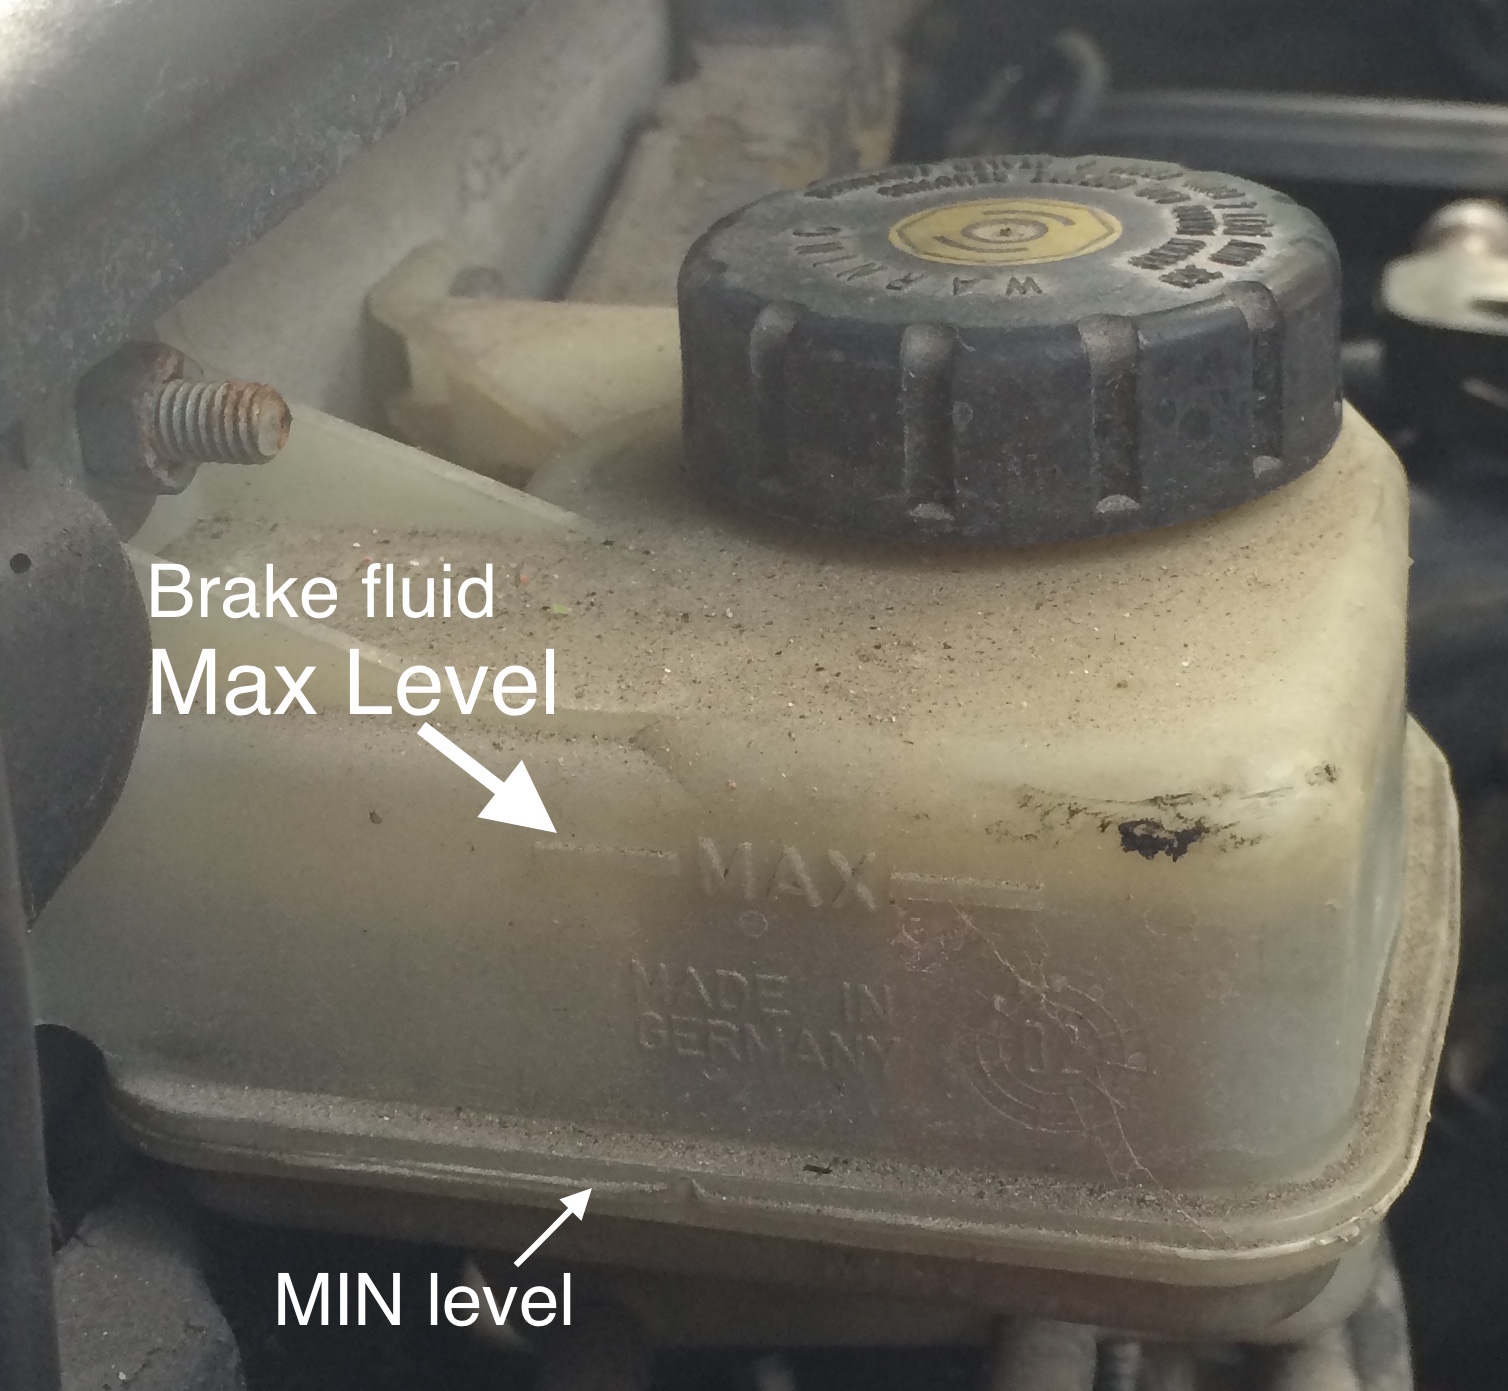
Brake fluid:
Check the photographs for the position of the brake fluid reservoir on your model of Freelander.
For both Freelander 2 models you will have to remove the lid above the engine bay to reveal your Brake fluid reservoir.

The MAX level marker is indicated on the side of the reservoir and the fluid level should be maintained to this level at all times.
1. Wipe the area around the filler cap with a clean cloth. It is a good idea to inspect the reservoir as the fluid should be changed if dirt is visible.
2. If the brake fluid level is below the MAX level carefully add brake fluid through the cap, avoiding spilling it on surrounding paintwork. Use only the specified hydraulic fluid; mixing different types of fluid can cause damage to the system and/or loss of braking effectiveness.
3. After filling to the correct level, refit the cap securely. Wipe off any brake fluid you may have spilt as this can damage paintwork and irritate skin.
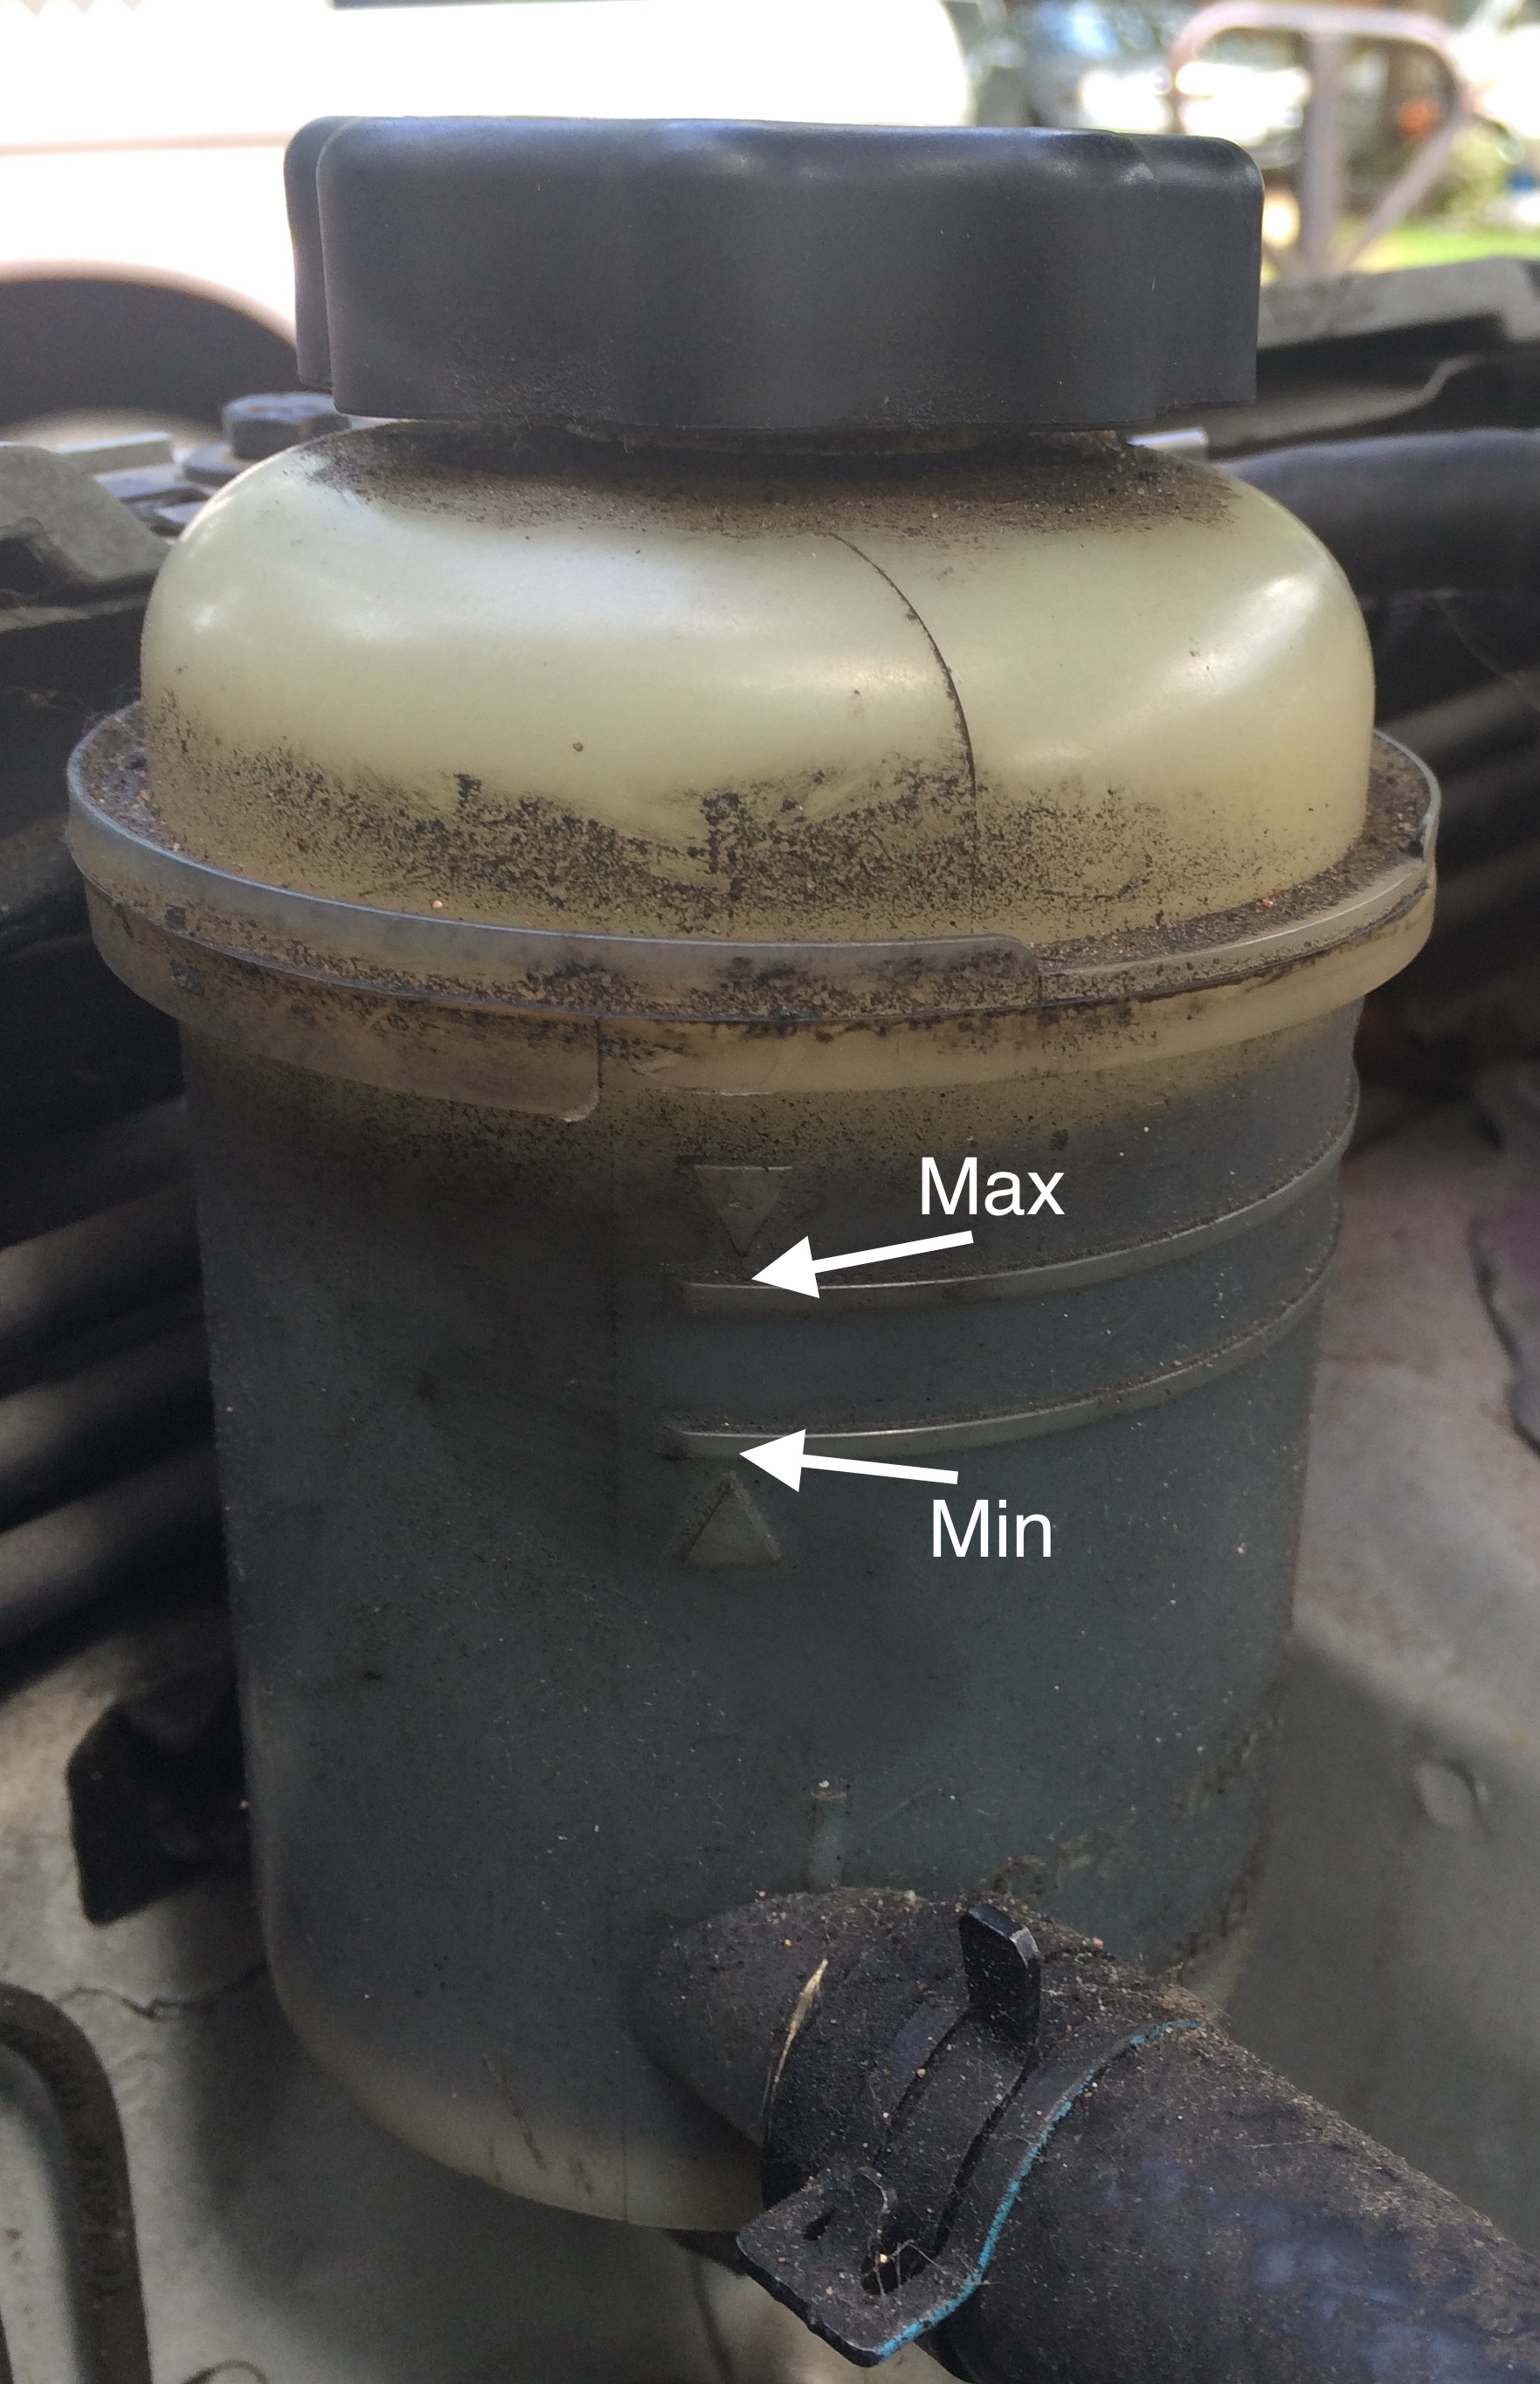
Power Steering Fluid:
Check the photographs for the position of the power steering fluid reservoir on your model of Freelander.
The MAX and MIN level marks are indicated on the side of the reservoir and the fluid level should be maintained between these marks at all times.
1. Wipe the area around the filler cap with a clean cloth. It is a good idea to inspect the reservoir as the fluid should be changed if dirt is visible.
2. If the power steering fluid level is below the MIN level carefully add PAS fluid through the cap, avoiding spilling it on surrounding paintwork. Use only the specified fluid; mixing different types of fluid can cause damage to the system and/or loss of steering effectiveness.
3. After filling to the correct level, refit the cap securely. Wipe off any PAS fluid you may have spilt.
Screen wash:
Check the photographs for the position of the screen washer fluid reservoir on your model of Freelander.
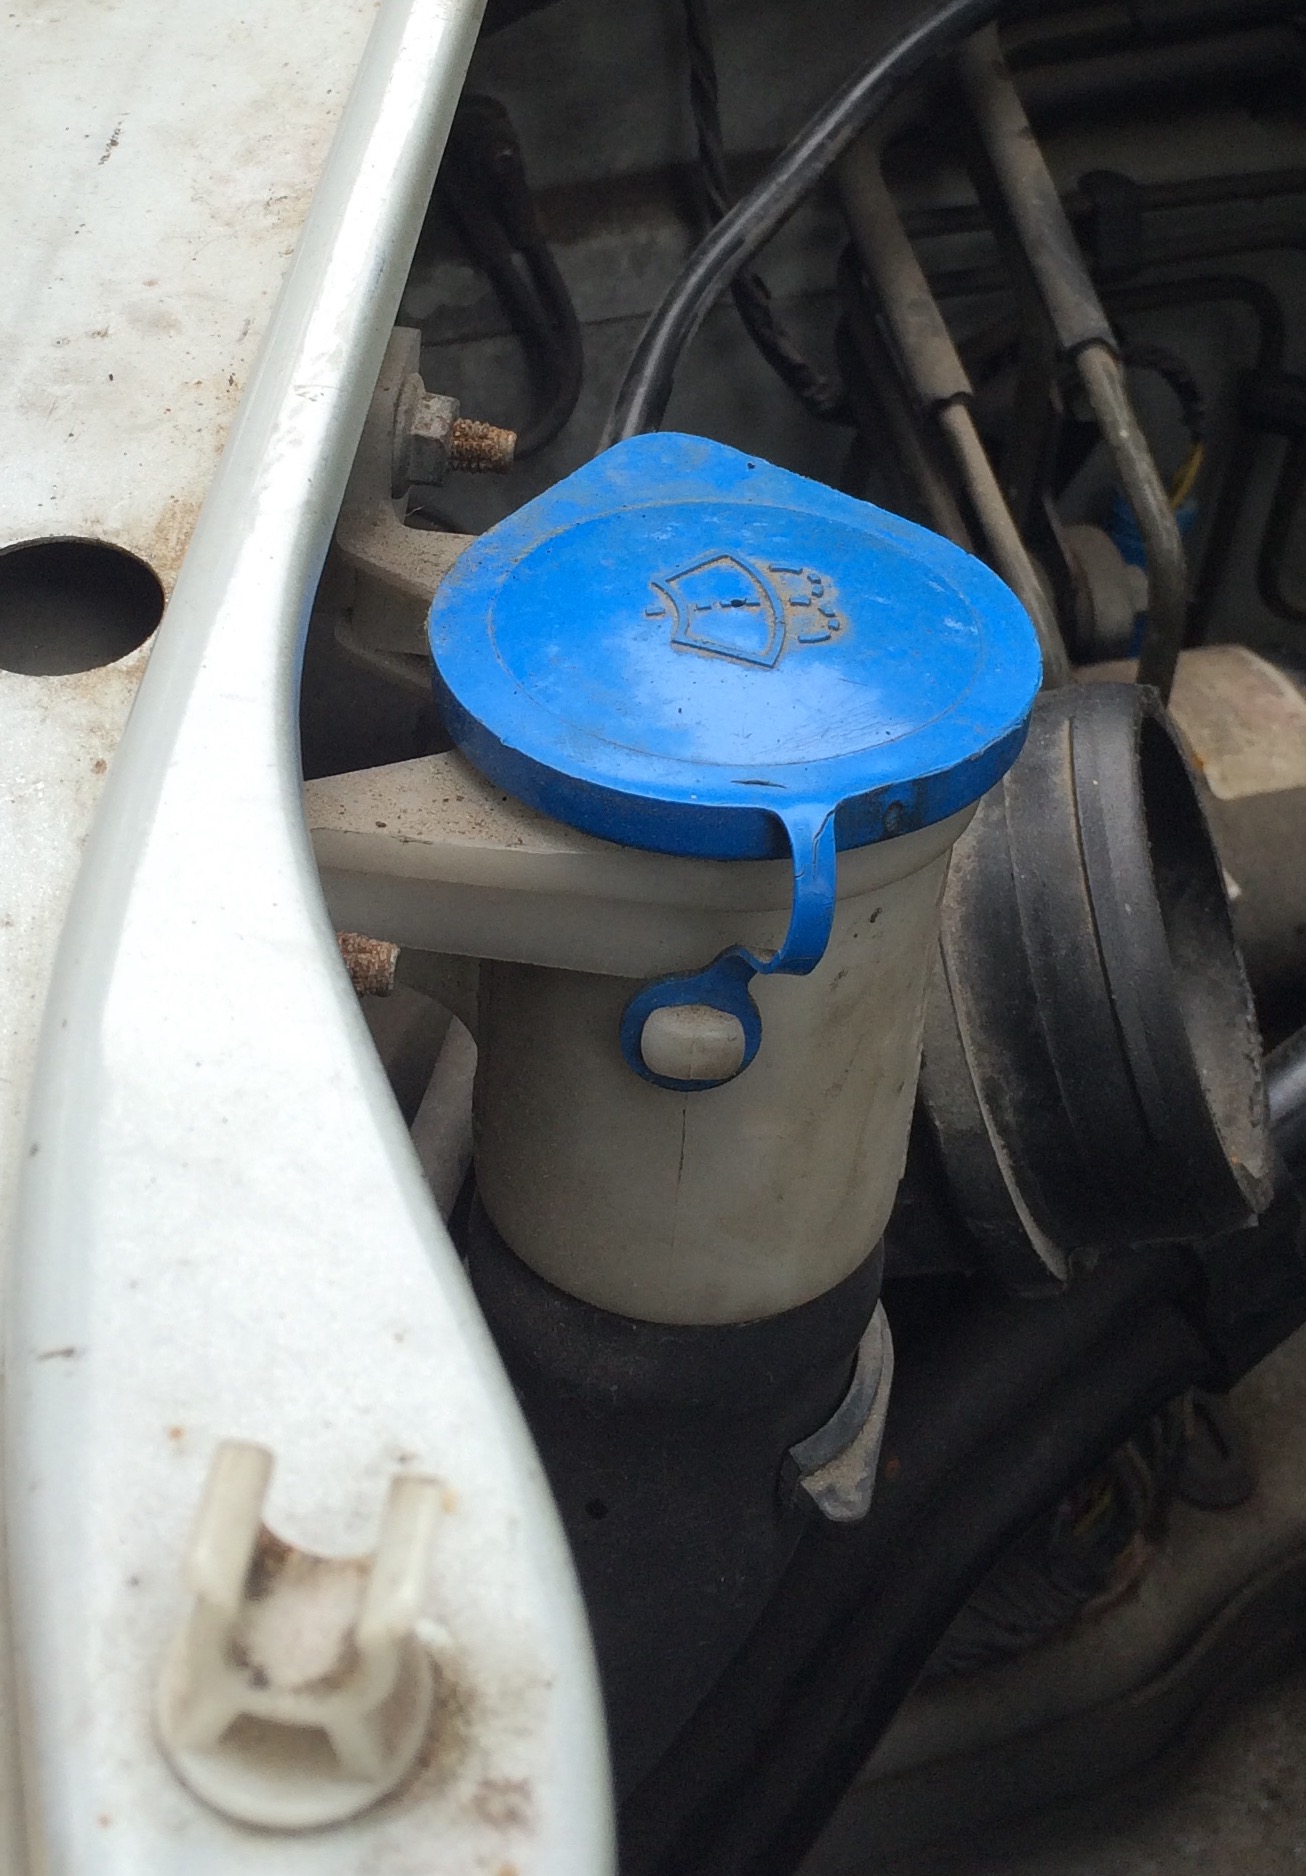
1. Check the level of your screen wash by removing the cap, you should then be able to see the blue screen wash fluid, if not then it needs topping up. There are no markers on the screen wash bottle.
2. If you cannot see the screen wash then it needs topping up preferably using a screen wash additive diluted as stated on the container. If you do not have access to a screen wash you can use plain water, this will not clean the windscreen as well as a screen wash but it is certainly better than nothing!
Hi Sue
My 2004 Freeland 2004 auto TD4 suddenly started losing coolant fluids. Before last week it behaved perfectly. It’s done 320k kms. It’s losing 1 litre in a 30 min drive. What is likely to be the problem?
Also where could I get a replacement leather driver seat recline adjustment wheel as that broke quite recently.
thanks
Carla and Simon
M +61 481 743503
Hi Carla & Simon,
My apologies for the delay in responding.
The things to check are:
– a leak on the water pump gasket or water pump itself;
– a split coolant hose;
– a leaking heater matrix (is there any dampness in the passenger footwell?
– a leaking radiator;
– particularly check the top radiator hose where it connects to the water outlet on the cylinder head, there is a square gasket there which can leak.
It could be worth doing a coolant pressure test.
All the best,
Sue
+44-780-9575-421
Thanks it was a split coolant hose. You were on the money!
Also where could I get a replacement leather driver seat recline adjustment wheel as that broke quite recently.
thanks
Carla
Hello my name ian . is henny one have a free lander that dont need of no more, I am interested .Thanks a Lot.
Hi my freelander 1 56 plate automatic has started making a knocking/ loud ticking noise. Mainly in idle but once I get over 10mph it stops.
Hi Paula,
Is the noise coming from the engine? Does it appear to be near the top of the engine or more toward the bottom? What level is your engine oil on?
If it is from the top of the engine then it could be one or more of the hydraulic lifters.
If you send us a video of the noise, to sue@freelanderspecialist.com; through WhatsApp to 0780 9575 421, or via our Facebook page FreelanderSpecialist.com, we may be able to give you a better diagnosis.
All the best,
Sue
0780 9575 421
Hi Sue
I have a 2005 Freelander TD4, auto
ABS,TC and HDC all amber remains on (3 Amigos lol), power has decreased on take-off and brakes are low (not as good before this happened)
Please advise as to what could be the problem, could it be an ABS sensor, brake switch (if so where is it?), etc.
Thank you
Hi Nick,
The three amigos – ABS HDC and TC warning lights illuminating – is normally caused by one of three things:
– A fault with the brake light switch situated under the brake pedal. These are only a few pounds so it could be worth changing this.
– A chaffed or broken connection in the wires under the gear stick gaiter – check these.
– A faulty wheel speed sensor. For this one you would be best to put it in diagnostics to determine which wheel has the fault.
These are the things to check first.
All the best,
Sue
0780 9575 421
Hi I have a Freelander td4 2005 I have a problem with the automatic transmission when I put it in drive the orange down hill light comes on and it pulls of very slowly and dsnt change gear can u help
Hi Phil,
It could a gearbox solonoid or perhaps a wheel speed sensor, the first thing to do is to put it on diagnostics and see what codes come up.
All the best,
Sue
0780 9575 421
Hi Sue,
I have a 2001, 1.8l Petrol Freelander.
Can you tell me please where is the clutch fluid reservoir here, in order to check the level?.
Many thanks!
Noam
Hi Noam,
The clutch fluid is in a sealed hydraulic system, there is no reservoir. There is a chamber on the hydraulics but it should not be opened.
All the best,
Sue
0780 9575 421
ok – thanks!
Hi sue my front diff is leaking and was wondering where the fill plug is to top it up on freelander 2 2009 td4 please
Hi James,
The fill plug for your front differential is on the rear of the diff where the prop shaft connects into it, just to the side of the pinion flange.
All the best,
Sue
0780 9575 421
Sue, I think my new Freelander 2 has been overfilled with oil (will confirm when I am on an absolutely level carpark).
Is there a recommended method/tool for siphoning off the excess oil?
It is a 2012 SD4 2.2.
Thanks again,
Richard.
Hie I got a Landrover Freelander 2 I recently imported from Uk to Zimbabwe 2007 model td4 it’s leaking oil btn the gearbox and engine also can use water and engine cleaner to clean to detect the leak I am scared to use water coz of electrical components and sensors
Hi Clifford,
The best thing is to use brake and clutch cleaner to clean around the leak so you can detect where it is coming from. It sounds like it could be the crank shaft seal which is leaking, however it is worth checking it is not leaking from the top and running down and collecting at the bottom.
All the best,
Sue
+44-780-9575-421
Hi I have a 1998 landy with a dead L series engine. I wanted to change the engine to a bmw 320D engine, is this possible without changing anything else except the engine.
Hi Thando,
Unfortunately you would need to change all the wiring, fuelling, ECU etc. etc. So no, they are not compatible and you would need to change a lot more than just the engine.
All the best,
Sue
Will I be able to use the gearbox/transfer box for the landy or will i have to convert into a rear wheel drive?
Does the engine oil turn dark during a half an hour run even if it has just been topped up?
I have a 2.2 td4 2012.
Hi Varun,
It depends on the condition of the oil that was already in there.
All the best,
Sue
Hi. I have a FL2 2.2 Diesel automatic which I love. Is there a way of checking gearbox oil levels without lifting the car up? As sometimes I can smell a bit a bit of burnt oil when I put more pressure on the gearbox eg. Sudden acceleration
Thank you
Hi Lucien,
You can check without lifting the car but you will have to inspect it from underneath. It is quite a detailed procedure to check the gearbox oil level as it has to be checked at the correct temperature.
All the best,
Sue
Hi There
My Freelander 1 Kv6 2.5L Petrol Automatic has a sort of kick when I accelerate to pick up speed. The kicking feeling is heavy. What could be the problem.
Hi Stephen,
Is it clonking / banging when you accelerate? If so then it will be a rear differential bush, generally the centre bush. The other thing to check is the lower tie rod end (lower engine mount).
All the best,
Sue
Hi Sue, my freelander 2 HSE temperature goes high when am driving and comes down to normal when I slow down. I have checked the coolant and found it’s low and refill it. But still does the same thing.i saw oil leaks from the oil sump and try to check all the nuts on the oil sump. From the top of the engine the are no oil leaks. Please help
Hi Dumi,
Which engine does your Freelander have, 2.2 TD4 diesel or the 3.2 I6 petrol? What year is it?
All the best,
Sue
I am getting error “Low Level Coolant”, despite the level of coolant being normal. Freelander 2 2.2 TD4 2008. What could be the issue?
Thanks
David
Hi David,
It could be that you have a faulty liquid low level warning switch, these are £15.52 + VAT (£18.62).
All the best,
Sue
+44-780-9575-421
HI,
Just purchased the 1.8 about a month ago and loving it! Wan’t aware of this site at the time but on it daily now!
I can see a note in the log book that at 56000 the engine replacement happened… but how do i tell if it is the old head gasket cover or the up-rated version? is there a part number to look for or shape, color etc?
Many thanks!
Hi Michael,
Congratulations on your purchase, great to hear you are loving your Freelander.
Unfortunately it is not easy to tell if a Freelander has the modified multi layer head gasket fitted except possibly by a very trained eye or by removing the cylinder head – which you would not want to do. If it was replaced in the last ten years there is a very good chance that it is an uprated head gasket as most people have been using these.
All the best,
Sue
+44-780-9575-421
I have a question about Water Coolant and wonder which is the best way to proceed.
I’ve just bought an old Freelander 1, registered in March 2000.
It’s in very nice condition with lots of paper work, which tells me that the vehicle had a head gasket replacement and all associated checks carried out by Land Rover in Swindon at 56,000miles.
The Vehicle is approaching 122,000 now and I’ve noticed an emulsified scum floating in the expansion tank.
I’m not having any over heating, rough running problems, don’t seem to be losing any coolant, and can’t see any external signs of a damaged head gasket.
I’m going to drain and flush the cooling system this weekend as I believe that a mixture of OAT and Silicate Antifreeze may have been used in the cooling system.
Could the mixing of these different antifreezes be the cause of this sludge in the expansion chamber?
One more question. I have conflicting information about which antifreeze to use. The Haynes Manual, and Halfords data sheets state that I should use a Silicate fluid, but everywhere else including the information you give above tells me to use an OAT coolant.
So what’s the safest fluid to use?
Many thanks in advance.
Hi Randell,
The mixing of the two coolants should not cause any scum int he header tank. As per Land Rover specifications we always use OAT coolant and have never had any issues with it, this is, therefore, what we recommend.
Flushing and refilling the coolant is a good idea.
Are you using any oil? If you have scum in the coolant and the head gasket is the issue then it is likely to be oil leaking into the coolant system so the coolant would not go down but the oil might.
All the best,
Sue
+44-780-9575-421
Hi Sue,
Thank you for getting back to me so quickly.
I haven’t noticed any loss of oil, but saying that I’ve only owned the vehicle less than a week.
I’ve been checking oil and water levels every day, and I’ll keep on doing this until I’m satisfied there isn’t a problem.
I’ll be flushing the system this weekend, I’ve also ordered a new expansion tank, as the item fitted is in very poor condition. (The plastic is very hazy).
Thank you again, this is a great website and obviously takes a lot of work to keep up to date.
It’s really appreciated.
Hi Sue, Ihad the problem with scum inthe coolant.. it turned out it was the oil cooler that was a small leak between water and oil
Renewed the oil coller and wupti.. to problem gone..
Hi Jens,
Good to hear you have sorted out the problem. Is your Freelander a TD4 diesel model? We have known this situation before.
All the best,
Sue
I have recently purchased 2009 Freelander 2 TD4 HSE. I’ve had the message on the dash low coolant level. The cap turns to the left then seems to jam when trying to remove. Thought I’d better ask before I force it.
Hi Leslie,
Congratulations on your purchase. The caps can be very stiff so it will be a case of putting a bit of power behind removing it.
All the best,
Sue
+44-780-9575-421
Nice guide. But you say power steering fluid should be maintainted between min and max at all times. In my freedlander 1 2002, the fluid is between min and max when the car is cold, but it goes 1 inch above max when the car is warm.
Hello Aman,
The power steering fluid does expand when the vehicle is warm. The fluid level should always be checked when:
– On level ground;
– Engine switched off;
– The system COLD;
– Steering is straight.
So, if you have checked it under the conditions above, it sounds as though your level is correct.
All the best,
Sue
+44-780-9575-421
My Freelander 1, model 2002, Petrol V6, 2490 CC has a problem with a Gearbox. When driving it makes a terrible noise. Where can I buy it from? What is the best recommeded coolant for my freelander and oil?
Hello Harriet,
We can supply a good used gearbox for £500. Alternatively you can get a reconditioned gearbox from Ashcroft Transmissions for £1,110 as an exchange unit.
You must use a coolant with Organic Acid Technology (OAT) in your Freelander. These coolants are generally red or orange. DO NOT use the blue or green coolant.
For the engine oil, most climates use 10W40 ACEA A2 API SH.
All the best,
Sue
+44-780-9575-421
Hi Sue, investigating fluid loss from underside of my freelander 1, would I be right in believing the tube which appears to be running from the passenger well is an evaporation collection tube and is it normal for this to drip and if so what evaporation is being collected?
Thanks in advance
Mick
Hi Mick,
Excellent, great to hear you have sorted it out now.
All the best,
Sue
+44-780-9575-421
Hi,
last time on my freelander HSE 2011. 2.2, i have added an ATF oil (red one) to the steering fluid when noticed its level below MIN, now 4 months after from that level back slowly again to the MIN and some trace of steering oil occur around the steering pupmp, so could you please help on that,,, do i need to change all the oil?,,and wich type of oil i can use?.
Regards
Djoubir
can grade 40 engine oil use in the land rover Freelander diesel engine
Hi Chris,
Which year is your diesel Freelander (there are three different diesel engines) and exactly which oil at you using? The diesel engines take a 5W30 oil not a 10W40 and depending on which engine it is will determine exactly which specification you should use.
All the best,
Sue
+44-780-9575-421
Hi, is there any specific power steering fluid you have to use for the freelander 2?
Thanks, R
Hi Rolf,
Yes, you need to use a Pentosin CHF202, it is a green fluid.
All the best,
Sue
+44-780-9575-421
I want to check my gearbox oil maybe change it. Can you tell me where the drain plug is and how many litres of fluid does it take to refill and also what’s the best fluid to use. I have a 2003 freelander 1 1.8 Manuel transmission
Hi David,
The drain plug is just underneath the driveshaft on the side of the gearbox. It takes 2.0 litres of Texaco MTF94.
All the best,
Sue
+44-780-9575-421
My wife’s 2003 Freelander S -2.5L V6 (77,000 miles) started producing white smoke this evening. It seemed to come from the Coolant Expansion Tank along with a loud hissing noise. Are you familiar with this problem? I’m worried it will be expensive to fix, whatever it is… I’ve already spent too much on this car and we have owned it for less than 2 months.
Hello C.Pahl,
Sorry to hear you are having problems with your wife’s Freelander so soon after you have purchased it. It sounds like it is taking in air. Can you see any hairline cracks around the neck of the coolant expansion tank? Is the bottom radiator hose getting hot when the Freelander is up to running temperature? If there is hissing from the coolant expansion tank cap we would suggest you replace both the tank and the cap – use genuine Land Rover, for these parts we have not had good experiences with some of the aftermarket ones – then make sure the system is thoroughly bled and that the coolant is flowing and the bottom radiator hose is getting hot. It may simply be an issue with the tank and cap, it is quite a common problem.
All the best,
Sue
+44-780-9575-421
where can i found map sensor on my 2003 freelander HELP PLEASE
Hi Jose,
If your Freelander is the 2.5 V6 Petrol model the MAP sensor is on the inlet manifold on the right hand side as you are facing the engine. If your Freelander is a 1.8 Petrol model the MAP sensor is on the inlet manifold on the left hand side as you are facing the engine.
All the best,
Sue
+44-780-9575-421
My freelander 1, 2,5V6S (78.000 km) looses a lot of cooler liquid. No leaks visible. The oil pressure lamp tends to blink every now and then. No problems starting. My mechanic tells me a leak in head gasket. Very expensive. Anyone who has experienced similar?
Hi Lotte,
Have you checked in the centre of the V of the engine for any leaks? Generally with these engines the first place they leak from is the thermostat housing, as this is a plastic housing situated in the hottest part of the engine, the V. The oil pressure light blinking could be completely unrelated, check the oil pressure sensor.
All the best,
Sue
+44-780-9575-421